I'm quite happy with this unit. It provides a lot of light, doesn't get hot, doesn't seem to cause much 'strobe' effect, and is small enough to put light exactly where you want it. I have two of them, and with the two, you can set up so that you rarely if ever have a shadow in your work area.
| |
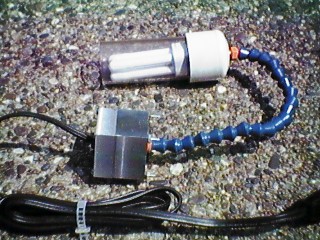
This is built from a 13 Watt GE compact fluorescent lamp that screws into a standard light bulb socket. It uses a magnetic ballast, which I have found to be a LOT more reliable than the electronic ballasts. This lamp has a replacable bulb unit, which figures into the design. |
The idea here is to separate the ballast and lamp, leaving the ballast fixed, but putting the lamp in a waterproof housing on the end of a flexible 'gooseneck'. I found a metal gooseneck at a surplus store, and verified it would hold position with the necessary weight suspended on the end. Then, while making threaded fittings for the ends of the goosneck, I got some threading oil on the goosneck, and it went as limp as wet spaghetti! Ugh! That wouldn't work in the intended application, so I needed a new plan. Well, I had some Loc-Line coolant tubing that was clearly stiff enough, so I got some more, and it makes an ideal flexible conduit for the wires to the lamp.
I carved a split box with my CNC system, mostly just seeing what I could do, to hold the ballast, and act as a junction box for the wiring. The CAD layout for the box was done in Bobcad/CAM.
 |
A detail of the inside of the ballast box. |
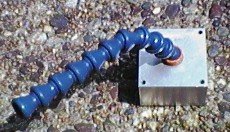 |
A detail of the outside of the ballast box. |
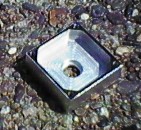 |
This is the other half of the ballast box. It is hard to see, but the big hole is actually a 'double D' shape, with two flats, for a Heyco power cord bushing. |
First, get a GE compact fluorescent lamp, product code 80507, UPC 43168 80507, description FLA13/SPX27. Remove the bulb and put the adapter unit in a lathe chuck, with the bulb socket facing out. Make a very careful cut about where the housing appears to be glued together, a little closer to the bulb socket end. When it breaks through, the whole thing has a tendency to fly apart, as mine did. I was spinning it way too fast for an operation such as this. You could also cut through it with a bandsaw or hacksaw. Just go slowly and carefully, so as not to cut the wiring or ballast.
When you get it apart, carefully remove the ballast inductor, and cut the wires between the ballast, socket and plug ends. The socket goes into the lamp assembly, and wires need to be soldered to the socket to run through the gooseneck and reach the ballast. The plug end can be discarded. The ballast needs to be housed in something that will allow heat to be dissipated, but keep water, swarf and oils out of it. I made my goosneck excessively long, planning to keep the ballast housing well above the spindle nose, to help keep it clean.
The wiring is pretty simple. The hot wire from the power cord goes to one lamp wire. The other lamp wire goes to one wire from the ballast. The neutral wire connects to the other ballast wire. I made the junctions with small wire nuts.
The lamp housing is made from a piece of 2" OD, 1.75 ID acrylic tubing. The OD isn't too critical, that ID is about as small as the lamp socket will fit into. The head of the lamp housing is a 1 1/2" Schedule 40 PVC end cap, drilled and threaded on the closed end for the 1/4" NPT fittings that go on the ends of the LocLine tubing. I also cut an O-ring groove on the side wall of the cap, to make a good seal to the acrylic tubing. I had to cut the OD of the acrylic tubing down just a bit, as my O-ring was too thick, and if I cut the groove any deeper into the cap, it would break through the outside. So, I recommend an O-ring thinner than a 1/8" cross section. An acrylic end cap can be made to close the open end of the acrylic tube. A reflector can be made out of aluminum foil or .010" aluminum flashing material. Just cut enough to go most of the length of the acrylic tube, and slightly more than half the way around the inner circumference. You can later rotate the lamp assembly to point the beam where you want it, and not have light shooting up into your eyes.